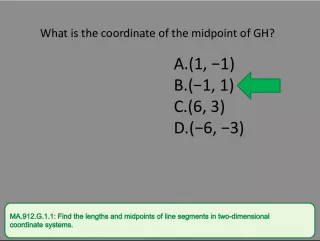
ross a line of symmetry A reflection moves a figure across a line of symmetry A rotation turns a figure around a fixed point A rotation turns a

Slide1Transformations on the coordinate plane Transformations on the coordinate plane Transformations on the coordinate plane Transformations on the coordinate plane Transformations Review Transformations Review Transfor
- Uploaded on | 18 Views
-
 polyan
About ross a line of symmetry A reflection moves a figure across a line of symmetry A rotation turns a figure around a fixed point A rotation turns a
PowerPoint presentation about 'ross a line of symmetry A reflection moves a figure across a line of symmetry A rotation turns a figure around a fixed point A rotation turns a'. This presentation describes the topic on Slide1Transformations on the coordinate plane Transformations on the coordinate plane Transformations on the coordinate plane Transformations on the coordinate plane Transformations Review Transformations Review Transfor. The key topics included in this slideshow are . Download this presentation absolutely free.
Presentation Transcript
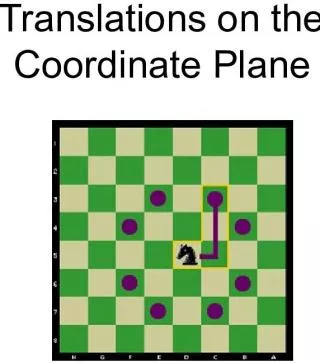
Slide1Transformations on the coordinate plane Transformations on the coordinate plane Transformations on the coordinate plane Transformations on the coordinate plane
Slide2Transformations Review Transformations Review Transformations Review Transformations Review Type Type Diagram Diagram A translation moves a figure left, right, up, or down A translation moves a figure left, right, up, or down A reflection moves a figure across its line of reflection to create its mirror image. A reflection moves a figure across its line of reflection to create its mirror image. A rotation moves a figure around a given point. A rotation moves a figure around a given point.
Slide3Now we will look at how each transformation looks on a coordinate plane. The transformed figure is often named with the same letters, but adding an apostrophe. The transformation of ABC is A’B’C’ . Now we will look at how each transformation looks on a coordinate plane. The transformed figure is often named with the same letters, but adding an apostrophe. The transformation of ABC is A’B’C’ .
Slide4TranslationTranslation Translation Translation Translate ABC 6 units to the right. Translate ABC 6 units to the right. Translate ABC 6 units to the right. Translate ABC 6 units to the right. 6 Units A B C A’ B’ C’ Find point A and Find point A and Find point B and Find point B and Find point C and Find point C and count 6 units to the right. Plot point A’ . count 6 units to the right. Plot point A’ . count 6 units to the right. Plot point B’ . count 6 units to the right. Plot point B’ . count 6 units to the right. Plot point C’ . count 6 units to the right. Plot point C’ .
Slide5Translation Rules Translation Rules • To translate a figure a units to the right, increase the x -coordinate of each point by a amount. • To translate a figure a units to the right, increase the x -coordinate of each point by a amount. • To translate a figure a units to the right, increase the x -coordinate of each point by a amount. • To translate a figure a units to the right, increase the x -coordinate of each point by a amount. Translate point P (3, 2) 9 units to the right. Since we are going to the right, we add 9 to the x -coordinate. 3 + 9 = 12, so the new coordinates of P’ are (12, 2) • To translate a figure a units to the left, decrease the x-coordinate of each point by a amount. • To translate a figure a units to the left, decrease the x-coordinate of each point by a amount. • To translate a figure a units to the left, decrease the x-coordinate of each point by a amount. • To translate a figure a units to the left, decrease the x-coordinate of each point by a amount. Translate point P (3, 2) 6 units to the left. Since we are going up, we subtract 6 to the x - coordinate. 3 - 6 = -3, so the new coordinates of P’ are (-3, 2)
Slide6Translation Rules Translation Rules • To translate a figure a units up, increase the y -coordinate of each point by a amount. • To translate a figure a units up, increase the y -coordinate of each point by a amount. • To translate a figure a units up, increase the y -coordinate of each point by a amount. • To translate a figure a units up, increase the y -coordinate of each point by a amount. Translate point P (3, 2) 9 units up. Since we are going up, we add 9 to the y - coordinate. 2 + 9 = 11, so the new coordinates of P’ are (3, 11) • To translate a figure a units down, decrease the y -coordinate of each point by a amount. • To translate a figure a units down, decrease the y -coordinate of each point by a amount. • To translate a figure a units down, decrease the y -coordinate of each point by a amount. • To translate a figure a units down, decrease the y -coordinate of each point by a amount. Translate point P (3, 2) 6 units down. Since we are going down, we subtract 6 to the y -coordinate. 2 - 6 = -4, so the new coordinates of P’ are (3, -4)
Slide7Translation Example 2 Translation Example 2 The coordinates of point A are (-5, 4) The coordinates of point A are (-5, 4) Since we are moving to the right we increase the x - coordinate by 6. Since we are moving to the right we increase the x - coordinate by 6. The coordinates of point B are (-2, 3) The coordinates of point B are (-2, 3) Since we are moving to the right we increase the x - coordinate by 6. Since we are moving to the right we increase the x - coordinate by 6. The coordinates of point C are (-3, 1) The coordinates of point C are (-3, 1) Since we are moving to the right we increase the x - coordinate by 6. Since we are moving to the right we increase the x - coordinate by 6. -5 + 6 = 1 , so the new coordinates of A’ are (1, 4) . -5 + 6 = 1 , so the new coordinates of A’ are (1, 4) . -2 + 6 = 4 , so the new coordinates of B’ are (4, 3) . -2 + 6 = 4 , so the new coordinates of B’ are (4, 3) . -3 + 6 = 3 , so the new coordinates of C’ are (3, 1) . -3 + 6 = 3 , so the new coordinates of C’ are (3, 1) .
Slide8PracticePractice • Point P (5, 8). Translate 2 to the left and 6 up. • Point P (5, 8). Translate 2 to the left and 6 up. • Point Z (-3, -6). Translate 5 to the right and 9 down. • Point Z (-3, -6). Translate 5 to the right and 9 down. • Translate LMN , whose coordinates are (3, 6), (5, 9), and (7, 12), 9 units left and 14 units up. • Translate LMN , whose coordinates are (3, 6), (5, 9), and (7, 12), 9 units left and 14 units up. P’ (3, 14) P’ (3, 14) Z’ (2, -15) Z’ (2, -15) L’M’N ’ (-6, 20), (-4, 23), (-2, 26) L’M’N ’ (-6, 20), (-4, 23), (-2, 26)
Slide9ReflectionReflection Reflection Reflection Reflect ABC across the y -axis. Reflect ABC across the y -axis. Reflect ABC across the y -axis. Reflect ABC across the y -axis. 5 Units 2 Units A B C 5 Units A’ 2 Units B’ 3 Units 3 Units C’ Count the number of units point A is from the line of reflection. Count the number of units point A is from the line of reflection. Count the same number of units on the other side and plot point A’ . Count the same number of units on the other side and plot point A’ . Count the number of units point B is from the line of reflection. Count the number of units point B is from the line of reflection. Count the same number of units on the other side and plot point B’ . Count the same number of units on the other side and plot point B’ . Count the number of units point C is from the line of reflection. Count the number of units point C is from the line of reflection. Count the same number of units on the other side and plot point C’ . Count the same number of units on the other side and plot point C’ .
Slide10Reflection Rules Reflection Rules • To reflect point (a , b ) across the y -axis use the opposite of the x -coordinate and keep the y coordinate the same. • To reflect point (a , b ) across the y -axis use the opposite of the x -coordinate and keep the y coordinate the same. • To reflect point (a , b ) across the y -axis use the opposite of the x -coordinate and keep the y coordinate the same. • To reflect point (a , b ) across the y -axis use the opposite of the x -coordinate and keep the y coordinate the same. Reflect point P (3, 2) across the y -axis. Since we reflecting across the y -axis. Keep the y the same and use the opposite of the x. (-3, 2) • To reflect point (a , b ) across the x -axis keep the x- coordinate the same and use the opposite of the y -coordinate • To reflect point (a , b ) across the x -axis keep the x- coordinate the same and use the opposite of the y -coordinate • To reflect point (a , b ) across the x -axis keep the x- coordinate the same and use the opposite of the y -coordinate • To reflect point (a , b ) across the x -axis keep the x- coordinate the same and use the opposite of the y -coordinate Reflect point P (3, 2) across the x -axis. Since we reflecting across the x -axis. Keep the x the same and use the opposite of the y . (3, -2)
Slide11PracticePractice The coordinates of ABC are: (-5, 4), (-2, 3), (-3, 1) Reflect ABC across the y -axis and then reflect it across the x -axis. The coordinates of ABC are: (-5, 4), (-2, 3), (-3, 1) Reflect ABC across the y -axis and then reflect it across the x -axis. To reflect it across the y -axis keep the y the same and use the opposite x. The new coordinates are: (5, 4), (2, 3), (3, 1) To reflect it across the y -axis keep the y the same and use the opposite x. The new coordinates are: (5, 4), (2, 3), (3, 1) To reflect it across the x -axis keep the x the same and use the opposite y. The new coordinates are: (5, -4), (2, -3), (3, -1) To reflect it across the x -axis keep the x the same and use the opposite y. The new coordinates are: (5, -4), (2, -3), (3, -1)
Slide12Rotation Rules Rotation Rules • To rotate a point 90° clockwise, switch the coordinates, and then multiply the new y - coordinate by -1. • To rotate a point 90° clockwise, switch the coordinates, and then multiply the new y - coordinate by -1. • To rotate a point 90° clockwise, switch the coordinates, and then multiply the new y - coordinate by -1. • To rotate a point 90° clockwise, switch the coordinates, and then multiply the new y - coordinate by -1. Rotate point P (3, 2) clockwise about the origin. Since we are rotating it clockwise, we switch the coordinates (2, 3) and multiply the new y by -1, so the new coordinates are (2, -3) • To rotate a point 180°, just multiply each coordinate by -1. • To rotate a point 180°, just multiply each coordinate by -1. • To rotate a point 180°, just multiply each coordinate by -1. • To rotate a point 180°, just multiply each coordinate by -1. Rotate point P (3, 2) clockwise about the origin. Since we are rotating it 180°, we simply multiply the coordinates by -1, so the new coordinates are (-3, -2).
Slide13PracticePractice • Point P (5, 8). Rotate 90° clockwise about the origin. • Point P (5, 8). Rotate 90° clockwise about the origin. • Point Z (-3, -6). Rotate 180° about the origin. • Point Z (-3, -6). Rotate 180° about the origin. • Rotate LMN , whose coordinates are (3, 6), (5, 9), and (7, 12), 90° clockwise about the origin. • Rotate LMN , whose coordinates are (3, 6), (5, 9), and (7, 12), 90° clockwise about the origin. P’ (8, -5) P’ (8, -5) Z’ (-3, -6) Z’ (-3, -6) L’M’N ’ (6, -3), (9, -5), (7, -12) L’M’N ’ (6, -3), (9, -5), (7, -12)