Understanding the Components of a Dial Caliper
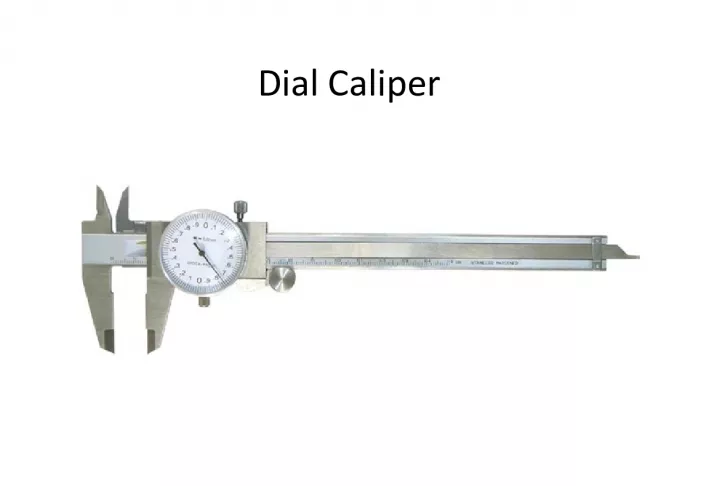

A dial caliper is a precision measuring instrument used to measure dimensions accurately. It comprises seven main components, including slide scale, lock screw, thumb adjustment wheel, measuring jaws, inside-out dial, depth rod, and bezel. This article provides detailed insights into each component of a dial caliper.
- Uploaded on | 0 Views
-
 rylanboyer
About Understanding the Components of a Dial Caliper
PowerPoint presentation about 'Understanding the Components of a Dial Caliper'. This presentation describes the topic on A dial caliper is a precision measuring instrument used to measure dimensions accurately. It comprises seven main components, including slide scale, lock screw, thumb adjustment wheel, measuring jaws, inside-out dial, depth rod, and bezel. This article provides detailed insights into each component of a dial caliper.. The key topics included in this slideshow are Dial caliper, precision measuring instrument, slide scale, lock screw, thumb adjustment wheel, measuring jaws, depth rod,. Download this presentation absolutely free.
Presentation Transcript
1. Dial Caliper
2. Dial Caliper The dial Caliper has seven main components: a slide scale, lock screw, thumb adjustment wheel, measuring jaws (inside & out), dial with measurements of 0.001 inch, depth rod and a bezel.
3. Internal Jaw
4. External Jaw
5. Depth rod
6. Depth rod
7. Reading a Dial Caliper
8. Dial Caliper Outside/Inside Steps Step 1. Loosen the lock screw at the top of the caliper. Position the object and move the slide and measuring jaws so that they are larger (for outside measurements, than the object you are attempting to measure. Step 2. Once you have correctly positioned the object, use the thumb adjustment wheel to move the caliper jaws until they come into contact with the object. Note: Apply enough pressure to allow the caliper jaws to come into contact with the surface object you are measuring. However, be careful not to press so forcefully that the pressure will prevent or restrict the removal of the caliper form the object, or that the object or the caliper jaws will be deformed by the pressure. Step 3. Next tighten the lock screw at the top of the caliper so that the reading will not change while you remove the caliper from the object. Step 4. Remove the caliper.
9. Dial Caliper Depth Measurements Step 1. Depth measurements are taken using the depth rod located at the end of the slide scale. This caliper is designed to take depth readings up to 6 (15,24cm) in length in holes 0.2 (5,08mm) or greater in diameter. Step 2. Align the end of the caliper with the hole you are attempting to measure. Position the caliper so that the depth rod is pointing into the hole. Step 3. Loosen the lock screw at the top of the caliper. Step 4. Spin the thumb adjustment wheel, extending the rod until it contacts the bottom of the hole you are attempting to measure. Note: Apply enough pressure it allow the depth rod to come into contact with the surface of the object you are measuring. However, be careful not to press so forcefully that the pressure will prevent or restrict the removal of the caliper form the object, or that the object or the caliper jaws will be deformed by the pressure. Step 5. Next tighten the lock screw at the top of the caliper so that the reading will not change while you remove the caliper from the object. Step 6. Remove the caliper from hole.
10. Vernier/Slide Caliper
11. Dial Caliper
12. Digital Caliper
13. Dial Caliper To read the Caliper first take the reading on the scale. On this one it would be 2.400 Then take the reading on the Dial this one is .055 Add them together and it will be 2.455 That is 2 inches & .455 Thousanths
14. Dial Caliper Try this one
15. Dial Caliper Answer is 1.931 Do the next 5
16. Read the Measurement 1
17. Read the Measurement 2
18. Read the Measurement 3
19. Read the Measurement 4
20. Read the Measurement 5